VeeValdi oryginal ECI

Compatível com
GTR 2 Idiomas suportados
multilingual, en, pl
multilingual, en, pl
Data adicionada: 21.09.2021 15:00
11 usuários tem esse item em favoritos
Informação Importante para os Usuários
Por favor, note que todos os mostradores de relógio disponíveis neste site são obras criativas dos nossos usuários e não estão afiliados com marcas oficiais ou marcas registradas. São criados por fãs para fãs, inspirados em fenômenos culturais populares, jogos, filmes ou séries.
Nosso objetivo é fornecer uma plataforma para criatividade e troca, mas também nos esforçamos para respeitar os direitos intelectuais. Se você detém direitos autorais sobre qualquer conteúdo que acredita infringir seus direitos neste site, por favor, entre em contato conosco para ações apropriadas.

Descrição
veevaldi_original_eci-en – wersja angielskojęzyczna / English version
veevaldi_original_eci-pl – wersja polskojęzyczna / Polish version
------------------------------------------------------------------------------------------------------------------
 [/url]
------------------------- PL -------------------------------------------------------------------------------------
„VeeValdi oryginal ECI”, to tarcza zegarkowa przeznaczona dla smartwatcha Amazfit GTR 2.
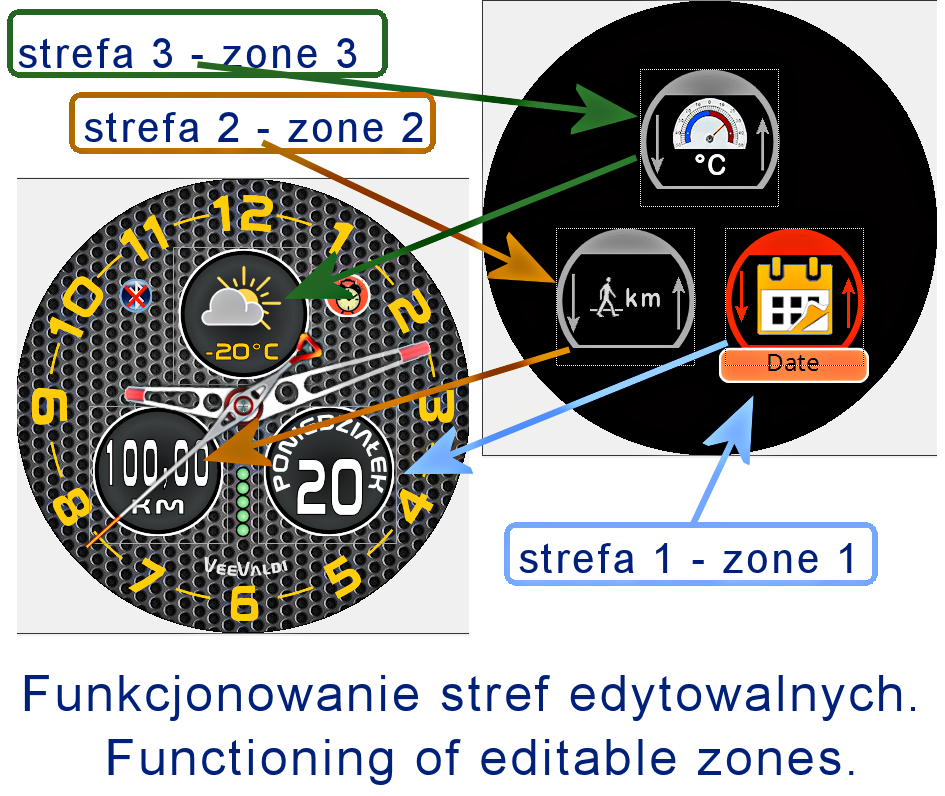
Na głównej tarczy zegarkowej czas jest prezentowany w wyłącznie formie analogowej. Wszystkie wyświetlane parametry można indywidualnie ustawić w 3 strefach edytowalnych. Jedynie stan naładowania akumulatora jest zawsze prezentowany w formie graficznej na głównej tarczy zegarka. 5 zielonych kropek to oznacza 100% energii w akumulatorze. Kropki zielone są stopniowo zastępowane przez kropki czerwone. Gdy pojawi się 1 kropka czerwona, to oznacza to, że stan energii spadł do 90%. 2 kropki czerwone a 3 zielone to oznacza stan energii do 80% i tak dalej za każdym razem o minus 10%. Wszystkie kropki czerwone to już tylko do 50% energii. Gdy pojawią się tylko 4 kropki, to zawsze będą one czerwone i to oznacza, że pozostało do 40% energii. Każda 1 kropka mniej to o 10% energii mniej w akumulatorze. Gdy pozostanie 1 kropka czerwona, to oznacza, że pozostało w akumulatorze już tylko do 10% energii. W trybie AOD prezentowany jest czas w formie analogowej i stan naładowania akumulatora – graficznie, czyli tak samo jak na głównej tarczy zegarkowej. Na głównej tarczy zegarkowej wyświetlana jest również ikonka pokazująca brak zasięgu bluetooth oraz ikonka sygnalizująca ustawienie alarmu.
Wyświetlanie innych parametrów na głównej tarczy smartwatcha samodzielnie może ustawić jego użytkownik. Wybiera się tak zwane strefy edytowalne. Są takie 3 strefy edytowalne. Robi się to palcem przyciskając centralnie tarczę zegarka, a następnie wybiera się ikonkę długopisu, a następnie obrazek graficzny strefy. Przesuwając palcem po tym obrazku wybieramy jaki parametr ma być wyświetlany w tej strefie. Akceptacja wyboru – górnym, bocznym przyciskiem na smartwatchu.
W strefie nr 1 zmienia się wyświetlanie parametrów prezentowanych w polu o kształcie koła, które położone jest na dole tarczy zegarkowej, po jej prawej stronie. Zamiennie można wybrać: datę (dzień miesiąca i nazwa dnia tygodnia), pogodę, indeks UV, siłę wiatru, ciśnienie atmosferyczne (hPa), stan naładowania akumulatora (%). W tym polu zawsze musi być wyświetlany jakiś parametr. Nie ma możliwości jego całkowitego wyłączenia.
W strefie nr 2 zmienia się wyświetlanie parametrów prezentowanych w polu o kształcie koła, które położone jest na dole tarczy zegarkowej, po jej lewej stronie. Zamiennie można wybrać: dystans (km), kroki, tętno (puls), kalorie, stan naładowania akumulatora (% ) i tzw. stanie („stand up”). Po wybraniu „stania” („stand up”) ten parametr nie jest wyświetlany, a tarcza zegarka staje się bardziej klasyczna (w tym polu nie są pokazywane praktycznie żadne parametry).
W strefie nr 3 zmienia się wyświetlanie parametrów prezentowanych w polu o kształcie koła, które położone jest u góry tarczy zegarkowej. Zamiennie można wybrać: pogodę (wyświetlana jest aktualna temperatura w °C oraz obrazek prezentujący graficznie stan pogody), indeks UV, siłę wiatru, ciśnienie atmosferyczne (hPa), stan naładowania akumulatora (%), datę kroki, tętno (puls), kalorie, dystans (km), datę (dzień miesiąca, nazwę dnia tygodnia oraz numer dnia miesiąca wraz z rokiem, a także „stanie” („stand up”). Po wybraniu „stania” („stand up”) ten parametr nie jest wyświetlany, a tarcza zegarka staje się bardziej klasyczna (w tym polu nie są pokazywane praktycznie żadne parametry). Po wybraniu daty znika koliste tło.
Najbardziej klasyczna wersja tej tarczy zegarka pojawi się wówczas, gdy wybierzemy „stanie” („stand up”) w strefie 2 i 3.
Ja preferuję u siebie następujące ustawienia: strefa 1 – pogoda, strefa 2 – stan energii akumulatora w %, strefa 3 – data (bez tła, dzień, miesiąc i rok, a także nazwa dnia tygodnia).
Załączam również obrazek pokazujący funkcjonowanie stref.
--------------------- EN --------------------------------------------------------------------------------------
"VeeValdi original ECI" is a watch face for the Amazfit GTR 2 smartwatch.
On the main watch face, the time is only shown in analog form. All displayed parameters can be individually set in 3 editable zones. Only the battery charge status is always displayed graphically on the main watch face. 5 green dots means 100% energy in the battery. Green dots are gradually replaced by red dots. When 1 red dot appears, it means that the energy level has dropped to 90%. 2 red dots and 3 green dots mean the energy level is up to 80% and so on by minus 10% each time. All red dots are only up to 50% of energy. When only 4 dots appear, they will always be red, which means up to 40% of energy is left. Every 1 dot less means 10% less energy in the battery. When 1 red dot remains, it means that only 10% of energy is left in the battery. In AOD mode, the time is presented in analog form and the battery charge status - graphically, i.e. the same as on the main watch face. The main watch face also displays an icon showing no bluetooth range and an icon indicating the alarm setting.
The user can set other parameters on the main dial of the smartwatch by himself. So-called editable zones are selected. There are 3 editable zones. It is done with your finger by pressing the clock face in the center, and then you select the pen icon and then the graphic image of the zone. By sliding your finger over this picture, we choose which parameter is to be displayed in this zone. Acceptance of the choice - the upper, side button on the smartwatch.
In zone 1, the display of parameters presented in the circle-shaped field, located at the bottom of the watch face, on its right side, changes. Alternatively, you can select: date (day of the month and name of the day of the week), weather, UV index, wind strength, atmospheric pressure (hPa), battery charge status (%). A parameter must always be displayed in this field. It cannot be completely turned off.
In zone 2, the display of parameters presented in the circle-shaped field, located at the bottom of the watch face, on its left side, is changing. Alternatively, you can select: distance (km), steps, heart rate (pulse), calories, battery charge (%) and the so-called state ("stand up" . After selecting "stand up", this parameter is not displayed and the watch face becomes more classic (practically no parameters are shown in this field).
In zone 3, the display of parameters presented in the circle-shaped field at the top of the watch face changes. Alternatively, you can choose: weather (the current temperature is displayed in ° C and a picture showing the weather condition graphically), UV index, wind strength, atmospheric pressure (hPa), battery charge status (%), date steps, heart rate (pulse), calories, distance (km), date (day of the month, name of the day of the week and the number of the day of the month along with the year, as well as "stand up". When "stand up" is selected, this parameter is not displayed, and the watch face becomes more classic (practically no parameters are shown in this field.) After selecting a date, the circular background disappears.
The most classic version of this watch face appears when you select "stand up" in zones 2 and 3.
I prefer the following settings: zone 1 - weather, zone 2 - battery energy level in%, zone 3 - date (without background, day, month and year, as well as the name of the day of the week).
I also attach a picture showing the functioning of the zones.
veevaldi_original_eci-pl – wersja polskojęzyczna / Polish version
------------------------------------------------------------------------------------------------------------------
[/url]------------------------- PL -------------------------------------------------------------------------------------
„VeeValdi oryginal ECI”, to tarcza zegarkowa przeznaczona dla smartwatcha Amazfit GTR 2.
Na głównej tarczy zegarkowej czas jest prezentowany w wyłącznie formie analogowej. Wszystkie wyświetlane parametry można indywidualnie ustawić w 3 strefach edytowalnych. Jedynie stan naładowania akumulatora jest zawsze prezentowany w formie graficznej na głównej tarczy zegarka. 5 zielonych kropek to oznacza 100% energii w akumulatorze. Kropki zielone są stopniowo zastępowane przez kropki czerwone. Gdy pojawi się 1 kropka czerwona, to oznacza to, że stan energii spadł do 90%. 2 kropki czerwone a 3 zielone to oznacza stan energii do 80% i tak dalej za każdym razem o minus 10%. Wszystkie kropki czerwone to już tylko do 50% energii. Gdy pojawią się tylko 4 kropki, to zawsze będą one czerwone i to oznacza, że pozostało do 40% energii. Każda 1 kropka mniej to o 10% energii mniej w akumulatorze. Gdy pozostanie 1 kropka czerwona, to oznacza, że pozostało w akumulatorze już tylko do 10% energii. W trybie AOD prezentowany jest czas w formie analogowej i stan naładowania akumulatora – graficznie, czyli tak samo jak na głównej tarczy zegarkowej. Na głównej tarczy zegarkowej wyświetlana jest również ikonka pokazująca brak zasięgu bluetooth oraz ikonka sygnalizująca ustawienie alarmu.
Wyświetlanie innych parametrów na głównej tarczy smartwatcha samodzielnie może ustawić jego użytkownik. Wybiera się tak zwane strefy edytowalne. Są takie 3 strefy edytowalne. Robi się to palcem przyciskając centralnie tarczę zegarka, a następnie wybiera się ikonkę długopisu, a następnie obrazek graficzny strefy. Przesuwając palcem po tym obrazku wybieramy jaki parametr ma być wyświetlany w tej strefie. Akceptacja wyboru – górnym, bocznym przyciskiem na smartwatchu.
W strefie nr 1 zmienia się wyświetlanie parametrów prezentowanych w polu o kształcie koła, które położone jest na dole tarczy zegarkowej, po jej prawej stronie. Zamiennie można wybrać: datę (dzień miesiąca i nazwa dnia tygodnia), pogodę, indeks UV, siłę wiatru, ciśnienie atmosferyczne (hPa), stan naładowania akumulatora (%). W tym polu zawsze musi być wyświetlany jakiś parametr. Nie ma możliwości jego całkowitego wyłączenia.
W strefie nr 2 zmienia się wyświetlanie parametrów prezentowanych w polu o kształcie koła, które położone jest na dole tarczy zegarkowej, po jej lewej stronie. Zamiennie można wybrać: dystans (km), kroki, tętno (puls), kalorie, stan naładowania akumulatora (% ) i tzw. stanie („stand up”). Po wybraniu „stania” („stand up”) ten parametr nie jest wyświetlany, a tarcza zegarka staje się bardziej klasyczna (w tym polu nie są pokazywane praktycznie żadne parametry).
W strefie nr 3 zmienia się wyświetlanie parametrów prezentowanych w polu o kształcie koła, które położone jest u góry tarczy zegarkowej. Zamiennie można wybrać: pogodę (wyświetlana jest aktualna temperatura w °C oraz obrazek prezentujący graficznie stan pogody), indeks UV, siłę wiatru, ciśnienie atmosferyczne (hPa), stan naładowania akumulatora (%), datę kroki, tętno (puls), kalorie, dystans (km), datę (dzień miesiąca, nazwę dnia tygodnia oraz numer dnia miesiąca wraz z rokiem, a także „stanie” („stand up”). Po wybraniu „stania” („stand up”) ten parametr nie jest wyświetlany, a tarcza zegarka staje się bardziej klasyczna (w tym polu nie są pokazywane praktycznie żadne parametry). Po wybraniu daty znika koliste tło.
Najbardziej klasyczna wersja tej tarczy zegarka pojawi się wówczas, gdy wybierzemy „stanie” („stand up”) w strefie 2 i 3.
Ja preferuję u siebie następujące ustawienia: strefa 1 – pogoda, strefa 2 – stan energii akumulatora w %, strefa 3 – data (bez tła, dzień, miesiąc i rok, a także nazwa dnia tygodnia).
Załączam również obrazek pokazujący funkcjonowanie stref.
--------------------- EN --------------------------------------------------------------------------------------
"VeeValdi original ECI" is a watch face for the Amazfit GTR 2 smartwatch.
On the main watch face, the time is only shown in analog form. All displayed parameters can be individually set in 3 editable zones. Only the battery charge status is always displayed graphically on the main watch face. 5 green dots means 100% energy in the battery. Green dots are gradually replaced by red dots. When 1 red dot appears, it means that the energy level has dropped to 90%. 2 red dots and 3 green dots mean the energy level is up to 80% and so on by minus 10% each time. All red dots are only up to 50% of energy. When only 4 dots appear, they will always be red, which means up to 40% of energy is left. Every 1 dot less means 10% less energy in the battery. When 1 red dot remains, it means that only 10% of energy is left in the battery. In AOD mode, the time is presented in analog form and the battery charge status - graphically, i.e. the same as on the main watch face. The main watch face also displays an icon showing no bluetooth range and an icon indicating the alarm setting.
The user can set other parameters on the main dial of the smartwatch by himself. So-called editable zones are selected. There are 3 editable zones. It is done with your finger by pressing the clock face in the center, and then you select the pen icon and then the graphic image of the zone. By sliding your finger over this picture, we choose which parameter is to be displayed in this zone. Acceptance of the choice - the upper, side button on the smartwatch.
In zone 1, the display of parameters presented in the circle-shaped field, located at the bottom of the watch face, on its right side, changes. Alternatively, you can select: date (day of the month and name of the day of the week), weather, UV index, wind strength, atmospheric pressure (hPa), battery charge status (%). A parameter must always be displayed in this field. It cannot be completely turned off.
In zone 2, the display of parameters presented in the circle-shaped field, located at the bottom of the watch face, on its left side, is changing. Alternatively, you can select: distance (km), steps, heart rate (pulse), calories, battery charge (%) and the so-called state ("stand up"
. After selecting "stand up", this parameter is not displayed and the watch face becomes more classic (practically no parameters are shown in this field).In zone 3, the display of parameters presented in the circle-shaped field at the top of the watch face changes. Alternatively, you can choose: weather (the current temperature is displayed in ° C and a picture showing the weather condition graphically), UV index, wind strength, atmospheric pressure (hPa), battery charge status (%), date steps, heart rate (pulse), calories, distance (km), date (day of the month, name of the day of the week and the number of the day of the month along with the year, as well as "stand up". When "stand up" is selected, this parameter is not displayed, and the watch face becomes more classic (practically no parameters are shown in this field.) After selecting a date, the circular background disappears.
The most classic version of this watch face appears when you select "stand up" in zones 2 and 3.
I prefer the following settings: zone 1 - weather, zone 2 - battery energy level in%, zone 3 - date (without background, day, month and year, as well as the name of the day of the week).
I also attach a picture showing the functioning of the zones.
Tags
analog
second hand
analog second hand
classic
modern type
modern design
elegant
steps
distance
km
battery
percentage of Energy
day of week
day name
day
day of the month
month
month in numerals
year and month and day
temperature
degrees Celsius
atmospheric pressure
hPa
wind
wind force
weather
weather condition
dynamic weather status icon
pulse
heart rate
calories
kcal
kilocalories
dynamic battery charge status icon
bluetooth
alarm
AOD
AOD function
Compatilhar este watch face
Comentários
Você precisa estar logado para postar ou responder aos comentários.
Discussões recentes na comunidade
Digital watch face request for gtr4
It is very beautiful i love it, thank you....
Seiko Full Metal Alchemist GTR 3
Oh my!! It's look soooo good. Thanks a lot @asoo it's beyond perfection...
Convert request for gtr4
This is the best digital watchface looks amazing great work thank you sir...
Request for gtr4 watchface
Perfect thank you 🙏...
Convert from balance to GTR 3
Thanks a lot...
Convert request
It is perfect thank you sir...
Simple watchface for gtr4
Thank you so much...
Sem comentários. Seja o primeiro a comentar.